How to Add Google Adsense Ads to Your Blog

Have you ever wondered how to add Google Adsense ads to your blog? It isn’t as straight forward as you think it should be so I I thought I’d help you out and walk you through the process. Adding Google Adsense ads to your blog or website is a great and relatively easy way to make money. When I first started out, I was inexperienced and very confused and overwhelmed by the entire process. And to be completely honest, I didn’t think it was possible to make money from ads, but I was wrong. This post should help clear up questions you may have when it comes to advertising with Google Adsense.
Getting Started
Before you begin to think about adding advertisements, make sure you have the following on your website:
Original content of at least 20 blog posts
An “About Me” page, “Contact” page and a “Privacy Policy” page
The above three pages in a navigation menu
No other ads from other ad networks
In order to be successful and get the most from Google Ads, you’ll have to be somewhat established and are getting a steady stream of traffic to your blog. Once you’ve already checked this, then you can begin the process of adding ads to your blog. Please note: Never click the ads yourself or encourage anyone to click them – this can cause you to have your Google Adsense account terminated or revoked.
Go to Google.com/adsense and click the blue “Get Started” button. Fill out your details to create your account.
Once you’ve created a Google Adsense account they will provide you an HTML code to paste into the backend of your blog or website. This code is required by Google so they can review your site to determine whether you’re a legitimate website. It is their decision if they will accept you for advertising. This process could a few days so be patient!
Once you’ve been accepted, you will need to paste the code they provide within the header tags of your blog. If you’re new to HTML and have no idea what I’m talking about, below are a few popular hosting sites and where you paste in the code provided by Google:
Squarespace:
Go to Google AdSense and sign up or click Get Started to login. You’ll need a Gmail/Gsuites account.
Once you’re logged in, you’ll see a sidebar menu on the left. From there, click on SITES then ADD SITE. Enter the URL of your site as example.com (no need for www or https) then click NEXT.
Copy the AdSense code that is provided to you, then head over to your Squarespace site. Click on Settings > Advanced > Code Injection > then paste the code from AdSense into the top HEADER code box. Click SAVE.
Then, head back over to AdSense and click SUBMIT.
Wix:
Go to the Tracking & Analytics tab in your site's dashboard.
Click + New Tool and select Custom from the drop-down list.
Set up your custom code:
Enter the code you already copied from Google AdSense.
Enter a name for your custom code (to help you identify the code if you have multiple codes).
Under Add code to pages, select All pages.
Select Load code once from the drop-down list.
Under Place Code in, select Head.
Click Apply.
Access Google AdSense again.
Check the I've pasted the code into my site checkbox.
Click Done.
Wordpress:
Install and activate the plugin “Insert Headers and Footers“.
In your WordPress menu hold your mouse over Settings then click on Insert Headers and Footers.
In the box that says “Scripts in Header”, paste the code that Google has given you and click save.
Blogger:
Go to Theme > Edit HTML and click once anywhere in the coding box. On your keyboard press CTRL and F. A little search box will pop up top right. Type in </head> and press enter. You will be taken to where that bit of coding is in the box.
Paste the code Google gave you above </head> and save
Once the code is copied to your website, you’ll need to be patient and wait for Google to accept you! If you don’t get accepted, review you'r site to see what could be missing and to make any necessary changes you make. Then apply again.
How to Create an Ad
You’ve been accepted and you’ve pasted the HTML code into your website. What’s the next step? You’ll need to log into your Google Adsense account and go to the dashboard. This is the Adsense homepage and from here you can track your earnings, page views and ad clicks.
When you’re ready to place ads in your blog, there are two options to consider. You can let Google place them for you (so they might end up anywhere within your posts, pages and site layou). Or, you can manually place ads yourself. Either is a fine option to consider, it’s all based off of personal preference.
For an example, let’s place an ad in the side bar of your blog/website. This is a great first option since it’s not too intrusive for your readers and will keep your blog looking neat and tidy. To create a side bar ad:
In the left Google Adsense menu go to Ads > Overview
Click on the “By ad unit” tab at the top
Click “Display Ads”
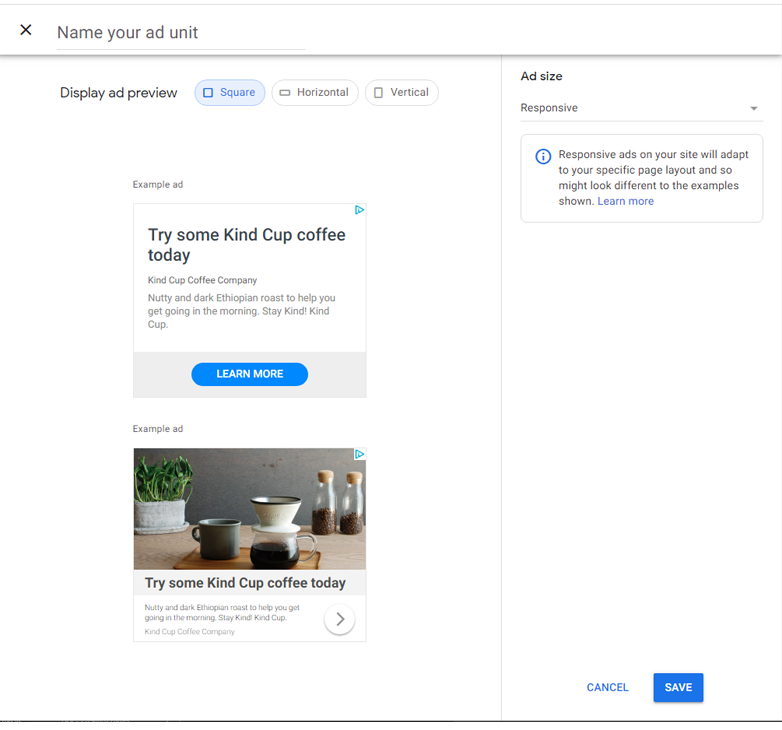
Name your ad at the top (eg. Side Bar) and select the size you want. I’d recommend square or vertical for the side bar (I have a vertical ad in mine). Choose “Responsive” for the ad size on the right and click the blue “Create” button.
Adding the Google Adsense Code
You’ve created your custom ad and saved it. What' next? Once you’ve clicked save they will provide another HTML code. This is the ad code which needs to be inserted into your website or blog. Copy the code they provide.
Squarespace:
On your Squarespace site, paste code from the ad service into Code Blocks
Wix:
Select the Google AdSense app in your Editor then click Settings. Paste the code and click Activate.
Note: It may take up to 48 hours for the ad to be displayed on your site.
Wordpress:
In your WordPress menu go to Appearance > Widgets and find your side bar area. Drag a “Custom HTML” widget into the side bar area, paste in the code and click save.
Blogger:
In your Blogger menu go to Layout and find your side bar area. Click “Add A Gadget” and add in a HTML/Javascript gadget. Paste the code into it and save.
When you first place an ad on your blog, it could take up to 48 hours for your ad to appear. I know you’re anxious for you ad to appear, but please be patient! If you were looking to create a targeted ad, this isn’t a feature Google Adsense provides. The content that appears to your viewers can’t be controlled by you. Most often, a reader will be targeted based on website’s they’ve viewed in the past.
As your blog gains more traffic, you might like to place more ads within your posts, in your footer, etc. You can add a few more at - header or footer and sometimes in-between posts. But I wouldn’t go crazy. Ads can be irritating and if you have too many, it may annoy your reader and they’ll most likely leave. You’re more likely to get more clicks on them if you place them strategically, rather than placing them all over the place.
Good luck!